Mountain Bike Frame Size Guide
Mountain Bike Frame Size Guide
One of the most common questions when buying a mountain bike, is “what size mountain bike frame do I need?”. This is the right question to ask, as getting the wrong size mountain bike can cause all sorts of problems. Therefore, I decided to put together a mountain bike frame size guide. I want you to understand the importance of getting a bike with the right frame size. It has to suit your body shape and your height. But there are few components you can change to ensure the right fit.
A mountain bike with the right frame size is so much more fun and safe than a bike that is the wrong size for you. This is because the right size bike is easier to navigate around technical terrain and to control.
What Happens If I Choose The Wrong Mountain Bike Frame Size?
By buying a bike that has the wrong size frame for you, you will not enjoy your rides as much. But you increase your likelihood of hurting yourself.
Over time, the wrong mountain bike frame size can cause aches and pains, as can an improper setup. By setup, I mean your bike could be the right size, but the saddle position, handlebars, crank lengths etc. can cause an uncomfortable ride.
In addition to all this, you may be feeling discomfort from weakness in your core or lack of fitness. To sort all this out, ride more and work on your core strength.
Common Problems And What Causes Them
Knee pain
Sore knees can be caused by having your saddle too high or too low. Also if you ride clipped in, your cleats may not be set up correctly. You may benefit from a cleat system with more float.
Back pain
This is usually caused by the river having a weak core. But, adjusting the reach or the handlebar position, you may be able to find a solution until you get fitter. You can also try lowering or raising the stem slightly to relieve lower back pain.
Shoulder/arm/ neck pain
If you get this, it may be down to you positioning on the bike. Sitting too far forward or backward can mean that you are not holding on to the bars properly. To alleviate this, you can try adjusting your stem and seat heights. You may want to try handlebars with a different rise or a back sweep. Discomfort can also be down to your choice of grips. You can try ergonomically designed grips that support your hands better.
Hip pain
This is usually caused by having the wrong saddle height. Also, your saddle could be angled too far forward backwards or forward, which doesn’t give you the proper support you need.
How Should I Feel On The Right Size Bike?
Arms – Your shoulders should be in a relaxed position with your elbows slightly bent.
Knees – Your knees should be slightly bent at the bottom of each pedal stroke.
You should be able to hold on to the bars without your hands getting tired or painful quickly – Experiment with moving your shifters handbrake levers. Move them further in on the bars or tilting them to be as comfortable as possible.
Everyone’s body is different. You may have longer legs and a shorter body, while your mate has long arms and short legs. So choosing the correct frame size is the starting point, before you tweak your bike by changing the saddle, bars and stem.
What Mountain Bike Frame Size Do I Need?
Mountain bike brand’s bike sizing can be tricky to understand. Traditionally mountain bike sizes are determined by the length of the seat tube. This figure can vary, as some seat tubes are measured to the top of the tube, while others are measured to the middle. This is where the top tube connects to the seat tube.
Bike manufacturers list the sizes of their mountain bikes based on the reach measurement. This is because they can make the bike longer while keeping the seat tube shorter and lower.
The advantage of this is that shorter riders can ride longer bikes, which are more stable. You still need to consider the seat tube length, though. This is because it will determine how low the saddle can be set. The length of the top tube will also dictate how stretched out the rider is.
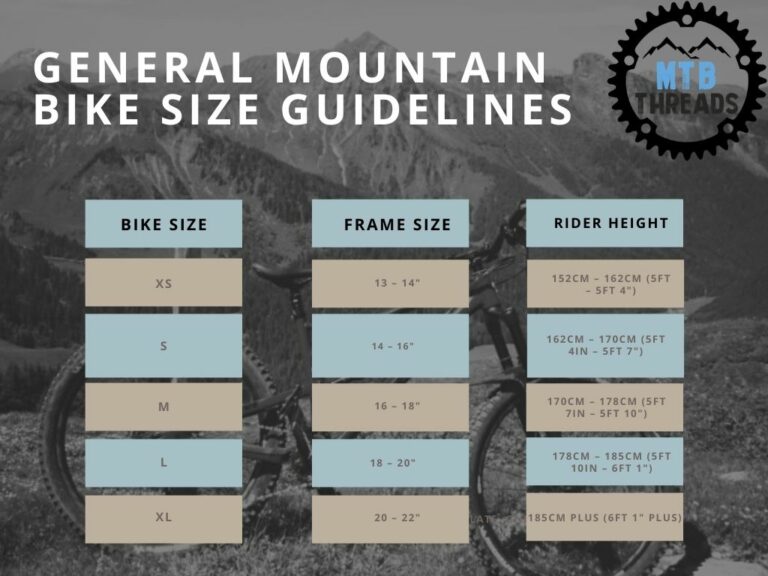
Most brands classify their sizes as XS, S, M, L and XL.
To determine which mountain bike frame size you need, the first thing to do is check out the manufacturer’s bike size charts.
Useful Geometry Terms
I am going to go through some parts of the mountain bike frame. This is so you are armed with some knowledge regarding how a mountain bike is shaped.
Seat Tube- The distance from the centre of the bottom bracket to the top of the seat tube.
The seat tube length dictates the minimum and maximum height the saddle can be set. It determines the height range of riders who can comfortably ride the bike. It also affects how low they can drop the saddle for when they are descending.
You need to compare important measurements for handling and fit, such as reach, against the seat-tube length. This allows you to define how long the bike is, relative to your height. This is because two medium-framed bikes can have different seat tube lengths that will fit different riders.
The ratio of reach to seat-tube length is particularly useful.
Effective Top Tube Length – Length of a horizontal line drawn from the top of the head tube until it meets the centre of the seatpost.

The effective top tube lets you know how roomy a bike will feel when you’re sitting in the saddle. It is a good way to work out how stretched-out the bike will feel.
Stack Height – The vertical distance from the centre of the bottom bracket to the centre-top of the head tube.

The stack height dictates how low the bars can sit relative to the bottom bracket. This gives you the minimum bar height. The stack height also is related to the bike’s reach.
Reach -The horizontal distance from the bottom bracket to the centre of the top of the head tube

The reach is of a bike is the mountain bike geometry figure that gives you the best idea of how a bike will fit you. It defines how roomy the bike will feel, for a given stem length.
However, the stack height has an effect on this.
Picture two identical bikes, but one had a taller head tube giving it a higher stack height. If you measured the reach of those two bikes, the one with the extended head tube would measure shorter. This is because the head angle is not vertical. Therefore, the longer the head tube, the further back the top of it becomes, shortening the reach. However, if you used spacers on the original bike, to make the bar height the same, both bikes would feel identical to ride.
If you are comparing the reach between bikes, you need to remember the one with the higher stack height will feel longer than its reach figure would suggest.
Down Tube Length – Distance from the centre of the bottom bracket to the centre of the bottom of the head tube
Down tube length gives you a good idea of how roomy the bike will feel. The length of the down tube is affected by the difference in height between the bottom bracket and the bottom of the head tube.
Comparing down tube lengths on bikes is only really necessary when the bikes have similar wheel sizes and fork lengths.
Front Centre – The horizontal distance from the centre of the bottom bracket to the front axle.
This determines where your weight sits on the bike. The longer the front-centre, your bike will be less prone to pitch forwards on technical terrain or during hard braking. This is because your weight will naturally sit further back.
A longer front-centre reduces the amount of your weight that is supported by the front wheel. You may find that this can reduce grip on the front-wheel unless you move your riding position forwards, or the rear-centre is made longer.
Rear Centre – The horizontal distance from the centre of the bottom bracket to the rear axle.

The front-centre is usually much longer than the rear-centre, mountain bikes tend to have a naturally rearward weight distribution. You can counter this by putting pressure on your handlebars, but it can be uncomfortable. The difference of rear centre to front centre length defines the front-to-rear weight distribution. The rear centre measurement is also known as your chainstay length. Some modern bikes, such as the Santa Cruz Mega Tower allow you to adjust this.
Longer rear-centres, therefore, make riding less tiring and easier to achieve a more balanced weight distribution. This, in turn, helps front wheel traction in flat corners.
However, when you are riding steep descents, the weight distribution becomes more front-biased thanks to braking. Therefore, a long rear-centre becomes less advantageous.
But, when riding a bike with a longer the rear-centre, the more the rider’s weight must be lifted (with the bottom bracket) to lift the front wheel. A bike with a shorter rear-centre is easier to manual but increases the effort required to properly weight the front wheel through the bar.
Wheel Base – The horizontal distance between the front and rear axles

The wheelbase is made up of the rear-centre and front-centre. It is difficult to determine how a bike will handle from its wheelbase. This is because the different combinations of the front and rear centre could give you the same wheelbase, but very different handling characteristics.
However, a bike with a longer means the distribution of the rider’s weight is affected less by braking, gradient changes or techy terrain. Therefore, a bike with a longer wheelbase is more stable.
However, the longer the wheelbase, the greater the angle through which the bars need to be turned (known as the steering angle) for the bike to follow a corner of a given radius.
Also, the difference between the arc taken by the front and rear wheels will be greater. This makes taking sharp corners more difficult, meaning you will need to skid or hop the back wheel more.
Bottom Bracket Height – The vertical distance from the floor to the centre of the bottom bracket.
Higher bottom-brackets, mean the higher the centre of mass of the rider. This causes the bike to pitch more when faced with technical terrain, hard braking or steep gradients. So, a lower bottom bracket improves stability.
But, a lower bottom bracket makes the bike more agile when taking corners. A lower bottom bracket lowers the rider’s centre of mass and the point at which the rider is connected to the frame. It also reduces the amount by which the rider’s mass drops as the bike leans into the turn. This means mountain bikes with lower bottom-brackets are easier to move in and out of turns.
Bottom-bracket height is affected by suspension sag and dynamic ride height. This means longer-travel bikes have higher static bottom-bracket measurements to compensate for suspension travel.
The problem with low bottom brackets is that you tend to catch pedals or your chain ring on rocks and roots.
Bottom Bracket Drop – The vertical distance from the line connecting the wheel-axles to the centre of the bottom bracket.
The bottom-bracket drop is a piece of mountain bike geometry that actually isn’t that important. Some people think that the distance the bottom bracket hangs below the wheel axles to directly determine the stability of the bike in turns as it affects the roll axis point.
In fact, the roll axis is the line connecting the tyre contact patches. The important measurement for cornering is the height of the centre of mass above this line and not the height of the bottom bracket relative to the axles.
Head Angle -The angle (measured from horizontal) of the steerer tube of the fork
Your bike’s head angle affects the distance the front axle sits in front of your hands. Bikes with slacker head angles make this distance longer.
So slack head angles make the bike less prone to pitching forwards when riding down steep descents. But, it also reduces the weight you put on the front wheel. This means you may need to put more pressure on the bars when taking on flat corners to prevent understeer.
However, slack head angles increase the bike’s trail (I’m coming to this). Bikes with more trail have a slower and calmer steering response. This results in less twitchy feel when cornering.
Suspension forks work parallel to the head angle. This means the head angle dictates where the axle is as the suspension moves up and down. Slacker angles mean the front-centre will shorten as the suspension compresses.
Actual Seat Angle – The angle (measured from horizontal) of the seatpost
The actual seat angle doesn’t really give you much information on how a bike rides on its own. Really, you need to look at the effective seat angle.
Effective Seat Angle – The angle of the line connecting the bottom bracket to the centre-top of the seatpost when set at pedalling height.

The effective seat angle gives lets you know the seated position of your hips relative to the pedals. Please be aware that moving your saddle forwards or backwards on its rails gives you about 3 degrees of adjustment of your effective seat angle.
If your bike has a straight seat-tube, the effective seat angle is the same as the actual seat angle. But bikes with a kinked or offset seat-tube (this is common in most full suspension mountain bikes), the effective seat angle is steeper than the actual seat angle. Therefore, your effective seat angle gets slacker; the higher the seatpost is set. This means taller riders will usually experience a slacker effective seat angle than shorter riders.
Geometry When The Suspension Is Sagged
Lots of mountain bikes are designed to compensate for when you are riding uphill, as well as suspension sag.
Climbing a 10% gradient has the same effect as slackening the angles by about 6°. The rear suspension on full-suspension bikes sags quite a bit more than the front suspension when in the saddle, especially when going uphill. For a typical 150mm travel bike, this could slacken the effective seat angle by a further 3 degrees or so.
Along with the rear-centre, the effective seat angle also determines where you are positioned between the front and rear axles. As you climb up steeper inclines, there comes a point where your centre of mass is directly above the rear contact patch. This is where you get wheel lift unless you’ve your weight forwards. The longer the rear-centre and the steeper the effective seat angle, the steeper the gradient that can be ridden before the wheel starts to lift.
The effective seat angle and the rear-centre also has an effect on the horizontal distance between the rear axle and the rider’s weight. The further in front of the rear axle you sit, the less you experience the effect of bumps from the rear wheel. This is because the bike pivots on the front axle when the rear wheel hits a bump. This means that, the closer the saddle is to that pivot point, the less it will move up and down when the back wheel hits bumps, making the ride more comfortable.
It is quite common for full-suspension bikes to have an effective seat angle steeper than 72-73 degrees.
Handlebar Height – Vertical distance from the floor to the grips
You may not realise how vital bar height is. But it can be easily adjusted with spacers, or by changing the bars for ones with a different rise.
If you raise the bars, it is easier for you to et your weight back. The result of being able to do this is reduced arm fatigue, and it instils confidence on steep descents. Additionally, it makes it easier to manual.
The height of your bars makes a difference to your attacks positions. This is because it affects how bent your elbows are and how far you can push the front wheel into holes and to absorb impacts.
Stem Length – Distance from the centre of the bar clamp to the centre of the steerer tube
Longer stems move your weight forwards, making it easier to climb. It also makes the bike feel a bit more roomy.
Short stems are used by downhill and enduro riders. This is because your weight is brought back a little, making your bike more stable on steep downhill sections. However, shorter stems make it more difficult to manual, and it takes a while to get used to the wandering sensation you get as you pedal uphill.
Click here to learn more about handlebars
Fork Offset – Distance between the front axle and the fork’s steering axis — the line running through the centre of the head tube, about which the fork rotates when steering.
Fork offset comprises of the forward sweep of the fork crown and the position of the axle in front of the lower legs.
Your Fork offset affects the trail of your bike (I’m coming to this). Forks with a longer offset give you less trail. This makes your steering quicker but gives it a twitchy feel. Forks with a shorter offset increase the bike’s trail. This makes your bike’s steering more stable, especially in steep corners or bumpy sections.
The fork offset also affects the front-centre (shorter offset means a shorter bike), as well as the distance between the rider’s hands and the front axle. For this reason, increasing the fork offset can feel a bit like a shortening the stem, in that the front wheel is further in front of the hands.
Ground Trail -Horizontal distance between the front tyre’s contact patch and the point at which the steering axis meets the ground.
The ground trail gives you a good idea of how a bikes’ steering will feel, concerning its stability.
It is affected by three different things:
- Wheel size
- Head angle
- Fork offset.
Slacker head angles mean the offset is shorter and larger wheel sizes or the more trail you get. If your bike has more trail, the more stable the steering is.
Mechanical Trail – Distance between the front contact patch and the steering axis when measured at 90 degrees to the steering axis

You may hear this being called ‘real trail’, and it is related to the ground trail. If you increase one, the other one will also be increased. It also relates directly to the self-centring effect or caster effect. The caster effect on a bike is when the contact patch trails behind the axis of which it is steered by. If the wheel is out of line, you get a force that keeps it in line with the direction of travel.
If your bike has a higher mechanical trail figure, the steering tends to stay straighter in rough terrain. However, you will need to put more effort into the handlebars to start a turn. This is because as the contact patch needs to be moved in relation to the frame via a longer (virtual) lever.
So, to make things simpler, if you have a longer mechanical trail, your bike will have more stable but lazier steering.
Sagged Geometry – The geometry of a bike when settled into its suspension travel under stationary rider weight.
Each bike has two different shapes. All the things I have talked about above is related to a bikes’ static geometry. But, when you get on your bike, it changes shape, thanks to the sag of the suspension. Hardtails are not affected as much as full-suspension bikes, but the compression of the forks steepens the head and seat angles. Also, the stack height shortens the front-centre and lowers the bottom-bracket height a little.
Choosing The Right Mountain Bike Size
When a mountain bike frame size is stated in inches, this refers to the distance from the bottom bracket axle to the top of the seat tube. However, it can also refer to the distance from the middle of the top tube to any number of places. This is because there is no industry standard. But even if there was an industry standard, it wouldn’t make much difference, as the shape of top tubes varies quite a lot.
The measurements are all related to the standover height. When you sand with your legs either side of the bike, you should have an acceptable gap between your top tube and your crotch, when you stand as far back over the bike. This should give you a minimum of an inch of clearance.
With this amount of clearance, you should have enough adjustment in your seat post, which is essential. However, this is more for people that are buying a cross country bike or a beginner’s bike. If you are looking at purchasing a downhill or an enduro bike, or one with a low slung top tube, there are some other considerations to look at.
Crank Length And Saddle Height
Most mountain bikes have cranks measuring 170mm and 175mm. This will suit most riders, but if you have short legs, they may be too long for you. Cranks that are too long for you will mean you can’t pedal without bending your knees too much at the top of the stroke.
Riders with long legs, you may want to fit longer cranks, to make sure you are using your full range of motion.
For riders not riding a bike with a dropper seat post (I recommend that you do), you will need to set your seat post at the perfect height that will give you as much pedalling efficiency as possible, while not being too intrusive when riding steeper descents.
If you set your saddle too high, your hips will rock from side to side, which wastes valuable energy. If you set it too low, you won’t be able to put in enough power, and it will be uncomfortable.
The perfect saddle height will see your leg fully extended at the bottom of the pedal stroke, with your heels on the pedal. This will mean that when you pout your food in the correct position on the pedal, your knee won’t lock out.
Reach
The reach is the most significant geometry figure when it comes to standing up on the pedals. The reach makes a big difference in how you are positioned on the bike when descending. It is also significant concerning how big the bike feels.
Cross country riders often prefer a long reach, but a beginner may want a shorter reach to give them a more upright riding position. Your reach should balance comfort, control and pedal efficiency.
Women’s Specific Mountain Bikes
Men and women are built differently; therefore, you can now buy women’s specific mountain bikes. However, look closely at the geometry figures, and you will see that many women’s bikes use the same frames as men’s bikes. The differences are usually the finishing kits that are designed specifically for women. This will incorporate different grips, saddles, lighter sponge forks and narrower handlebars.
Now Buy A Mountain Bike!
I hope you have found this mountain bike frame size guide useful. But I recommend that you go to a bike shop to get fitted for your new bike properly.
Please leave your thoughts and questions in the comments section below.